
Tags
blog hop, fabric rosette, felt, hair accessory, LOveBug Creations, Lovebug Creations Creative Team, Lovebug Creations Rumple Ribbon, ribbon, ribbon project, ruffled fabric rosette, Rumple Ribbon, scandinavian, seam binding, windmill
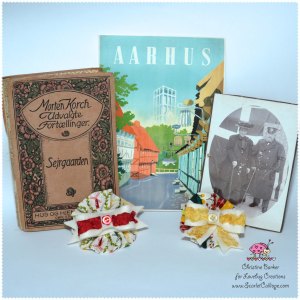
Scandinavian Inspiration

Den Gamle By
Aarhus, Denmark
Today’s project is inspired by the city of Aarhus, Denmark, where my family and I recently visited while on vacation. Den Gamle By means “Old Town” and a charming Danish town has been recreated in Aarhus (pronounced Oar-Hoos) as it might have been in Hans Christian Andersen’s days, with streets, shops, yards, homes and workshops straight out of the 1800’s. From the windmill to the bakery to the geese swimming in the pond and the bee hives in the garden, inspiration was everywhere and I was entranced.
Now for the tutorial! To create my project, I combined ruffled fabric rosettes with some Lovebug Creations Rumple Ribbon and a scrap of felt and made some adorable Scandinavian-inspired accessories. (Check out my tutorial to learn how to make a simple rosette)

To start, I had some whimsical windmill fabric in my stash so I made my favorite quickie project: Ruffled Fabric Rosettes!

To make the felt bow, cut:
- (1) piece of felt measuring 1″ x 6″
- (1) piece of felt measuring 1″ x 4″
- (1) piece of felt measuring 1/2″ x 2″

On the 6″ piece of felt, draw a dotted line at the 3″ mark with a fabric marker to indicate the halfway point.
Next, measure out one 6″ length and one 4″ length of Lovebug Creations Rumple Ribbon. For my bows I used Simply Red and William. (Whenever I read that, I read it as Will.I.Am. Anyone else do that?)
Using your hot glue gun, attach the 6″ ribbon down the center of the 6″ piece of felt.

Cut a notch in both ends of the 4″ piece of felt. Glue the 4″ piece of ribbon to the felt now and trim the ends of the ribbon.

Take the 6″ piece of felt and bring one end up to meet your dotted line. Attach it using your hot glue gun. Repeat with the other end.

Add a dot of hot glue to the middle, on the seam, and bring up each of the sides to give the bow some shape. Hold it until the glue cools.
Attach the bow to the 4″ piece of felt using hot glue.

Next, wrap the small 1/2″ x 2″ piece of felt around the center of your bow and attach using your hot glue gun. Add a small button or cute detail to the center of your bow.

For a variation, you can cut the 4″ piece of felt in half and glue it to your bow this way.

Attach the bow to a bobby pin and you’ve got a simple but pretty hair accessory.

I can’t decide which bow style I like best!

Glue the bow to your rosette and attach a pin back and you can have a sweet pin to wear. Or, attach a clip to the back and you can wear it in your hair. Or, attach it to a headband, or a gift bag! This project gives you lots of versatility!
I hope you enjoyed this tutorial and please visit Lovebug Creations to see all of the latest colors of Rumple Ribbon and Mama’s Mesh.
And, I’ll let you in on a scary secret! The Lovebug Creations Creative Team has a blog hop starting on September 7 featuring a new product release that you just don’t want to miss. It will be frighteningly amazing!!! And of course, there will be presents for some lucky winners! Mark your calendar!
xo,
Christine Barker
PS: It means so much to me to receive comments and know that people are enjoying my projects. Please leave some love!
Don’t miss a single project! Subscribe now via email or Bloglovin’ and get all of the crafty goodness first!

super wonderful work! Kisses from Spain
Gracias mi amiga! Thanks for stopping by!
Super cute!
Thanks for the tutorial – you as always design wonderful projects!!
Cyberhugs……….Mama LoveBug
I’m still super jelly of your AWESOME vaca! Lucky lady! Oh my…in true Christine fashion you are back at it with awesome ideas and a rockin’ tut!!! These bows are sooooo fabulous!!! I love them both too…and yes….Even tho William is a family name (my grandpa, my dads middle and my sons middle!) I still look at it that way and half the time that’s what I think when I type it 😉 Again…Love this project ♥
Thanks for always being one of my greatest cheerleaders! I love making projects with Lovebug Creations Rumple Ribbon! ❤
So creative – I will have to give them a try. I love both of them!!!!
I see what you mean. Both bows are outstanding!
What a fabulous vacation and your bows are gorgeous! Thanks so much for the tutorial 🙂